7 Steps To Make Your Own DIY Serving Tray
For an easy and removable indoor activity, try using stencils and acrylic paint pens to decorate your windows! This project is fun for the whole family and won’t damage your glass. This can be done at home or even in the window of your business. Paint your windows to celebrate the holidays or just for fun!
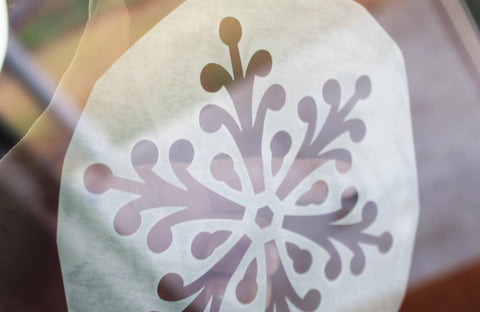
Below, we're decorating for Christmas with some adhesive stencil snowflakes.
What you need to paint a window:
- Adhesive stencil (we used a collection of snowflakes)
- Acrylic paint pen
- Scissors
- Window cleaner
- Rag
- Exacto knife (optional)
1. Clean windows before painting
Using a rag and a cleaner like Windex, make sure the inside of your window is clean. You'll be painting on the inside of the window, so it's important to make sure the glass is free of dirt and streaks.
2. Cut out the stencils
If you have a sheet of multiple shapes, you'll need to separate your pieces so you can freely move them. Cut around the shapes, making sure not to cut through the grooves in the adhesive material.

3. Peel away adhesive backing
Work with one stencil at a time. Peel away the adhesive backing. (For more information about how to properly peel adhesive stencils, check out our adhesive stencils guide.)
4. Place and smooth down stencil on window
Once the stencil has been removed, carefully place it on the window. We suggest doing it slowly, section by section to avoid air bubbles. Peeling adhesive stencils can sometimes require patience and a gentle touch, so parents, you might want to take over for this step.
Don’t worry if you have to unstick and re-stick the adhesive. Our adhesive stencils are very tacky and can be re-stuck a few times before losing their grip.

To get the cleanest lines, make sure your stencil is flatly affixed to the glass. Use your fingers to smooth out any creases and air bubbles in the material.
To check if there are any small air bubbles where paint might seep through, go to the opposite side of your window. If you see areas that are completely white, they should be smoothed down onto the glass. When the stencil is stuck to the window, it'll become a gray-ish color.
5. Color in the stencil
Acrylic paint pens are the easiest way to color in stencils on glass. Before using them, they need to be shaken to loosen up the paint inside. Prior to drawing on the window, test out the pen on scrap paper to make sure it's working properly. Most types of acrylic paint pens also require you to press down on the nib to make the paint flow.
Use the paint pens exactly like you would use markers on paper. Color the stencils whatever colors you like -- we used white to make these snowflakes!

6. Let acrylic paint dry
Before peeling the stencil off, give the paint 10-20 minutes to dry. While acrylic is a fast-drying paint, it can take longer to dry on a smooth glass surface. If the stencil is peeled off when the paint is still wet, it can make streaks in the paint.
7. Peel stencil away from window
Once the paint has dried, grab one corner of your stencil and pull it down and away from the glass.

8. (Optional) Clean up edges
If paint seeped past the edges of the stencil, you can use an Exacto knife or matt blade to gently scrape away at excess paint. Make your blade as parallel as possible to the glass to avoid scratches.

This project is perfect for decorating the house for the holidays, a rainy day indoors activity or for a fun family project to do with kids. The paint can later be removed with some acetone nail polish remover and a rag. Also, any of our stencil designs can be made out of our adhesive material, just leave us a note at checkout!
Written by Colin Mitchell
Leave a comment
This site is protected by hCaptcha and the hCaptcha Privacy Policy and Terms of Service apply.