Today we’re going to use stencils to make a custom t-shirt! There are a few options and methods that you can use to customize your shirt, bag, sweatshirt, etc. With just a few materials, you can easily make an awesome shirt.
There are two options when it comes to stenciling your item: an adhesive or a mylar stencil. Both have pros and cons!
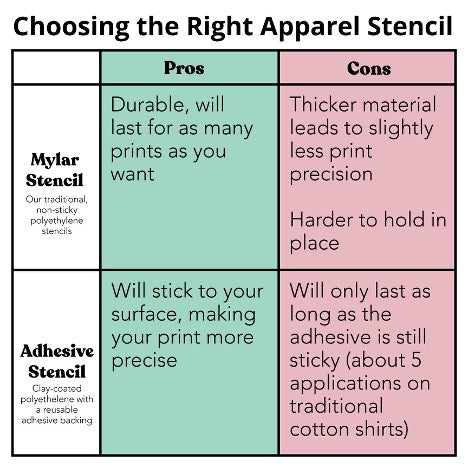
If you choose a mylar stencil, you can also use a spray adhesive on the back. The spray adhesive will have a similar effect to the adhesive stencils, but less strong.
After choosing your desired stencil material, there are also a few options to choose from for your paint. We recommend using a fabric paint, such as Speedball’s Fabric Screen Printing Ink.

There are just a few more materials that we recommend using.
Materials needed:
- T-shirt or other apparel item
- Mylar or adhesive stencil
- Acrylic paint, fabric paint, or fabric spray paint
- Sponge (the more dense the better)
- T-shirt-sized cardboard
- Surface for mixing paint (such as a plate)
- Something to mix with (such as a palette knife)
- Masking tape (optional)
- Spray adhesive (optional)
- Iron and scrap fabric (optional)
If you are using a textile medium for your acrylic paint, we recommend the Delta Cermacoat Textile Medium. For sponges, we recommend using a disposable makeup sponge. You can get them at almost any drugstore. For a spray adhesive, we used the Krylon Spray Adhesive.
Let’s get started! First, gather your materials.


We used a palette knife to mix our acrylic paints together.
In order to prevent the paint from bleeding through the fabric, we put a piece of cardboard inside the shirt. This also helps to flatten out the fabric for a better print quality.

We used a small amount of spray adhesive to attach the mylar stencil to the t-shirt fabric. For stencils that have a lot of small parts, using some sort of adhesive will prevent the paint from bleeding outside of where the stencil is placed. The adhesive will also keep the stencil in place while you are painting. If you are using an adhesive stencil, you don’t need to use it!
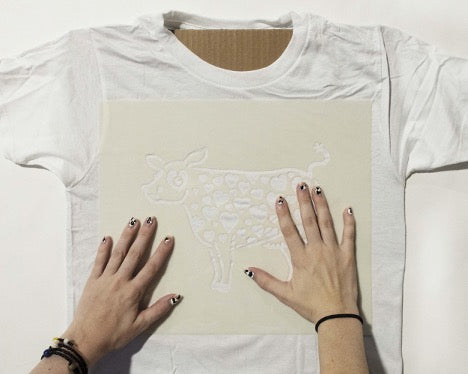
Once you place your stencil where you want it, make sure to press it down firmly. If you want, you could even use a rolling pin to make sure all the pieces are stuck onto the fabric.
For added security, you can tape down the edges of the stencil with some masking tape.


Now you’re ready for paint! We recommend keeping your paint close to where you are working.

When using the paint, make sure to wipe any excess off of the sponge. You want to take your time with dabbing paint on, otherwise you might experience paint bleed along the edges of the stencil.

Start dabbing paint onto the stencil slowly. We recommend makeup sponges because they are very dense, which make for less wasted paint and a more even print layer.


Make sure to touch up your print from all angles before you peel. Use a very small amount of paint to dab onto the blank parts.
Once the paint has dried, you’re ready to peel!

Peel up one corner of your stencil and start to slowly pull it away from the fabric. Hold down your shirt while you pull.

As a last step we recommend heat-setting your print, especially if it was made with acrylic paint like ours above. For this, you will need an iron and some lightweight scrap fabric.
Cover your print with the fabric and put your iron on the highest setting appropriate for your fabric. Iron over each section for 30 seconds. This will help ensure that the paint has bonded to the fibers in the fabric.
In a few easy steps, you have a finished custom t-shirt! Mylar stencils can be reused indefinitely, and adhesive stencils will last for around 5 prints.

Leave a comment
This site is protected by hCaptcha and the hCaptcha Privacy Policy and Terms of Service apply.